Terraform: Configuring OCI Object Storage Backend
What to do with the terraform.tfstate file? That seems to be a frequent question for terraformers. The terraform.tfstate file keeps track of the current state of your configuration. It contains resources, their IDs, and various other bits of metadata related to your configuration. By default, this file is stored in the local directory, from which you issue the terraform commands. Of course, having only a local copy can be an issue, since it can easily be deleted. Putting the state file into a source control repository is also a poor option since it can contain secrets. A good solution is to write the state file to a secure object storage, such as the OCI Object Storage. Think of object storage sort of like Dropbox, a remote file storage system which allows you to store all kinds of files, just like on an external hard drive. As a matter of fact, Dropbox is built on Amazon’s S3 object storage service.
Terraform has the ability to define an object storage backend for the state files. Once configured, terraform will then reference the state files from the object storage, rather than from the local disc. There are multiple ways of using an object store backend. In this post, we will use an S3-Compatible backend. Configuring the OCI Object Storage as a backend for Terraform requires a few preparatory steps:
- Create an object storage bucket.
- Generate access keys to the bucket.
- Configure the *.tf resource file to use the bucket.
Create an object storage bucket
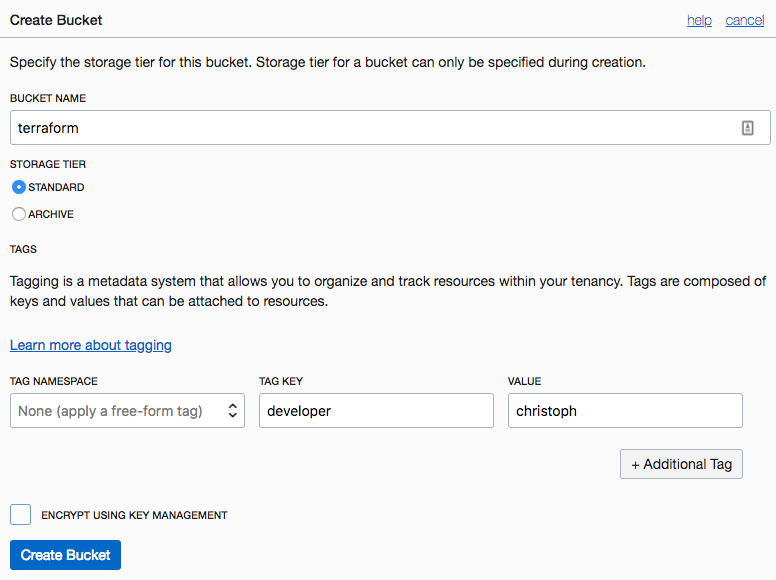
Creating the bucket is easy. You just need to specify the bucket’s name and select whether it is a Standard or Archive bucket, and whether it is encrypted. We will use the standard, unencrypted one for this example.
Alternatively, you can also use the OCI CLI to create the bucket:
$ oci os bucket create --name terraform
Generate Access Keys
In order for our Terraform resource to gain access to the bucket, we will need a secret access key. This consists of a key ID and the secret. This key is associated with an OCI User account, which needs to have access to object storage. To generate the key, navigate to Identity -> Users -> User Details -> Customer Secret Keys. From there click Generate Secret Key. You’ll be asked for a name, then the UI provides you with the secret. Make sure to copy this secret as there is no way to retrieve it once you navigate away from the screen.
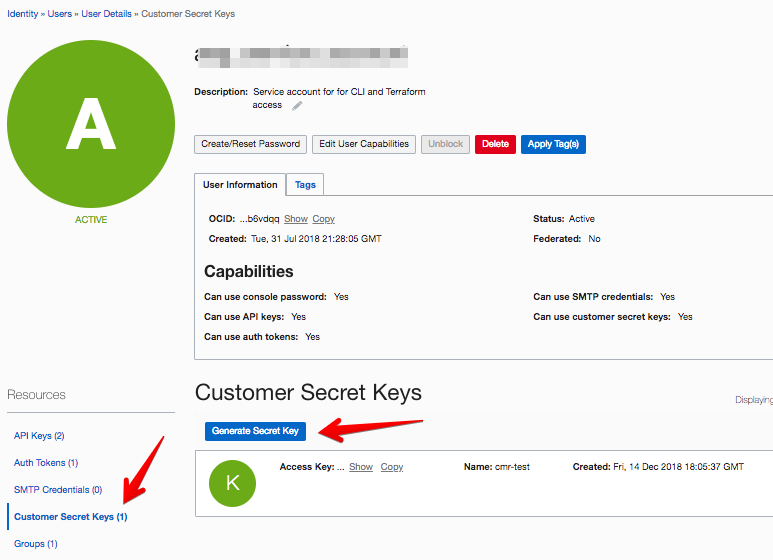
After the key is created, also copy the Access Key.
From the command line you can generate the key like this, using the OCID of the privileged user:
$ oci iam customer-secret-key create --display-name tf_os_access --user-id ocid1.user.oc1..aaaaaa...
{
  "data": {
    "display-name": "tf_os_access",
    "id": "xxxxxx...",
    "inactive-status": null,
    "key": "yyyyyy...",
    "lifecycle-state": "ACTIVE",
    "time-created": "2018-12-14T18:32:02.253000+00:00",
    "time-expires": null,
    "user-id": "ocid1.user.oc1..aaaaaaaa..."
  }
}
Make sure to copy the id and the key values
Now that you have these values, it is a good idea to include them in your environment variables file that contains your other Terraform variables. Since the OCI Terraform backend configuration is based on Amazon’s S3 service, the OCI provided didn’t bother to change the environment variable names for the key variables. So export the key ID and the secret like this:
$ export AWS_ACCESS_KEY_ID=xxxxxx...
$ export AWS_SECRET_ACCESS_KEY=yyyyyy...
Note: Alternatively, you can reference the [default] credentials from the AWS credentials file. Its default location is ~/.aws/credentials. Example:
[default]
aws_access_key_id=xxxxxx...
aws_secret_access_key=yyyyyy....
Configure the Terraform Resource File
terraform {
  backend "s3" {
    endpoint   = "https://your_tenancy_name.compat.objectstorage.us-ashburn-1.oraclecloud.com"
    region     = "us-ashburn-1" # Region of Object Store Bucket
    bucket     = "terraform"
    key        = "your_resource_name/terraform.tfstate"

    skip_region_validation      = true
    skip_credentials_validation = true
    skip_get_ec2_platforms      = true
    skip_requesting_account_id  = true
    skip_metadata_api_check     = true
  }
}
Make sure to replace the various values with your own. The endpoint needs to begin with the name of your tenancy, and include the region. The region variable also needs the bucket’s region. The bucket name is the one we created earlier. The key is the path and filename of the state file. Note that object storage doesn’t really use directories like in a file system. But you can organize your files in such a way that it seems like you have directories. It is a good idea to include the name of your configuration in the key so that you can find it again later.
Putting it all Together
If you altered the main.tf of an existing configuration, and have a local state file, issuing a terraform init will put the current state into the backend storage. You may get prompted to confirm that you agree with the change.
For a new resource, the next time you do a terraform apply, the state file will be written to object storage. Any further actions (plan, show, apply) will then reference the state file from the bucket.
You can now look at the bucket to verify that your state file is there:
$ oci os object list --namespace your_tenancy_name --bucket-name terraform
{
  "data": [
    {
      "md5": "xpRxxxxxxxxxxmA==",
      "name": "your_resource_name/terraform.tfstate",
      "size": 97009,
      "time-created": "2018-12-14T18:40:30.246000+00:00"
    }
  ],
  "prefixes": []
}
Let me give a shout out to Imran Syed Nayer, whose help was instrumental in creating this post.